
In this article, we talk about:
- Headings (h2, h3 and why no h1)
- The text context menu
- hyperlinks
- text highlights
- subscripting
- superscripting
- strikethrough
- Spacing
- 20px spacing
- 40px spacing
- Lists
Headings
When we talk about typography, we usually start with 6 types of headings (h1, h2, h3, h4, h5, h6). However, as per SEO standards & suggestions, we should stick to 3 types of headings: h1, h2 & h3. Among these, you can find custom patterns for h2 and h3 in Gutenberg patterns.
This is a 2nd heading <h2> (custom pattern)
To insert a 2nd heading, in the Gutenberg editor, type “/ti-h2” and press enter (⏎); OR,
- Click on
 .
- Go to Patterns > My Patterns.
- Search for
ti-h2.
This is a 3rd heading <h3> (custom pattern)
To insert a 3rd heading, in the Gutenberg editor, type “/ti-h3” and press enter (⏎); OR,
- Click on .
- Go to Patterns > My Patterns.
- Search for
ti-h3.
Why not a pattern for <h1> though?
The essence of a pattern is the reusability of it. Since there should be only one h1 in an entire page, we have not created a pattern for h1. Let’s see how we can use the available typography patterns:
The text context menu
By default, a WordPress block is a paragraph. Each time your cursor is on any particular WordPress block, and you press ⏎, by default, you are on a paragraph. You can still explicitly insert a paragraph using “/paragraph“.
Also: if you want to go to the next line in the same paragraph (without moving to a different paragraph, press “shift [⇧] + enter [⏎]“.
When it comes to text styling, WordPress facilitates you with quite a few things:
Text alignment
To align a certain paragraph,
- Select the paragraph
- In the WordPress text context menu, click on text alignment (4th in the row below).

Note:
You can’t make a piece of text bold just by clicking on
Hyperlinks (native block):
You can insert a link in 2 ways:
- Key binding:
- Select the text that you want to convert into a hyperlink.
- Press “
[ctrl] + k“. - In the dialog box, enter the URL.
- UI
- Select the text that you want to convert into a hyperlink.
- Click on the paperclip button
 .
- In the dialog box, enter the URL.
Example: This is a link that takes you to Google’s homepage.
Text highlights, subscripting, superscripting & strikethrough (native block):
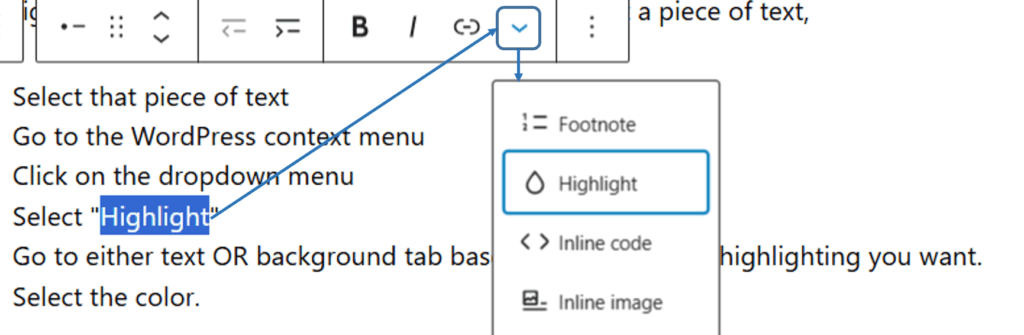
These are some of the core Gutenberg features. To highlight (or subscript, or superscript, or strikethrough) a piece of text,
- Select that piece of text
- Go to the WordPress context menu
- Click on the dropdown menu
- Select “Highlight” (or the other options as needed)
- Go to either text OR background tab based on what kind of highlighting you want.
- Select the color.
Example:
Lorem ipsum dolor sit amet,
consectetur adipiscing elit.
Ex sapien mine pellentesque sem placerat in id. Pretium tellus duis convallis tempus leo eu aenean.
Spacing
Gutenberg comes with a default spacer block that you can use insert from [editor > blocks > spacer] OR just by typing “/spacer“. However, we suggest using the 2 pattern spacing options created for TARA – to maintain spacing consistency:
20px spacing (custom pattern):
To insert a 20px spacing, in the Gutenberg editor, type “/ti-spacer-20” and press enter (⏎); OR,
- Click on .
- Go to Patterns > My Patterns.
- Search for “
ti-spacer-20“.
Use the 20px spacer to insert small gaps between multiple paragraphs of the same section.
40px spacing (custom pattern):
To insert a 20px spacing, in the Gutenberg editor, type “/ti-spacer-40” and press enter (⏎); OR,
- Click on .
- Go to Patterns > My Patterns.
- Search for “
ti-spacer-40“.
Use the 40px spacer to insert larger gaps between multiple different sections.
Lists (native block):
Lists are native to WordPress. To match basic HTML lists with TARA’s color palette, we have just applied some additional styling. You have already been looking at 2 types of lists throughout this documentation, but let’s see how you can use it.
To insert a list, type “/list” and press enter (⏎); OR,
- Click on .
- Under Blocks, search for “List”.
- Insert the list by clicking on the list block.
- You can add new list items to the list just by pressing enter (⏎).
Switching between default vs accent styles:
Sometimes, when you have a list in continuation to a paragraph, you’d like to use a barebones classic unordered/ordered list. When you insert a list following the process above, you get the classic list.
However, at times you will find laying out the list elements shouldn’t appear as obvious, and it’d be nice if you could just wrap them with some nice styling. In this case, you should switch to the accent lists.
How do you switch?
- Select the list (not the <li> items, but the <ul>)
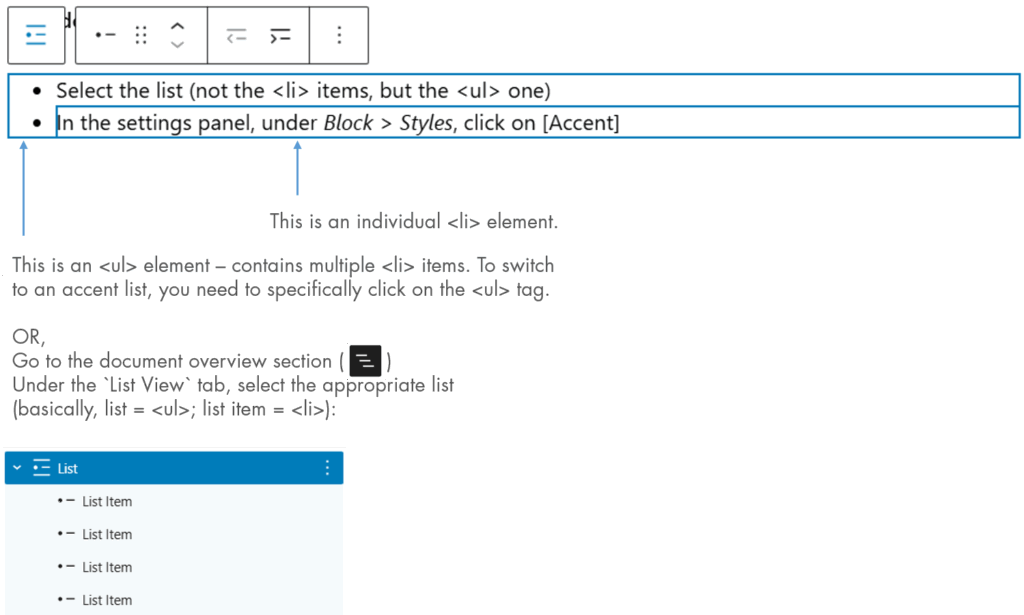
- In the settings panel, under Block > Styles, click on [Accent List]
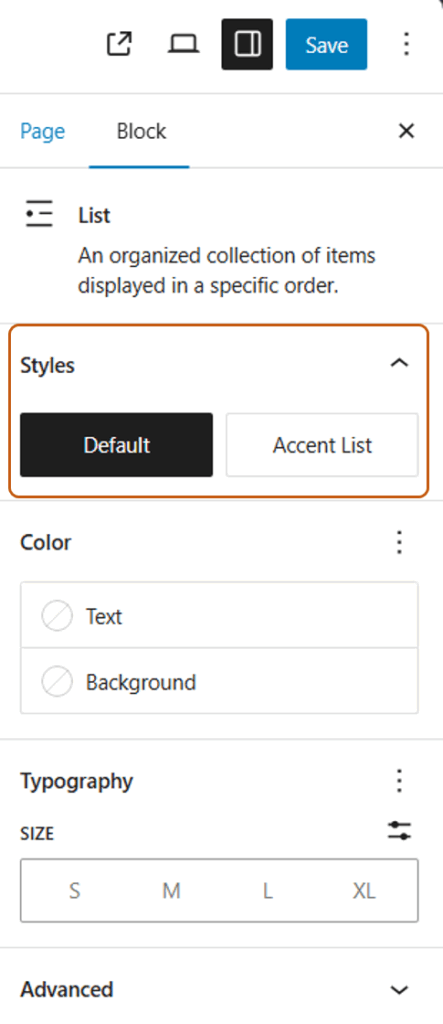
The following is how a regular list looks:
- Lorem ipsum dolor sit amet,
- consectetur adipiscing elit,
- sed do eiusmod tempor incididunt ut labore et dolore magna aliqua
The following is how an accented list looks:
- Lorem ipsum dolor sit amet,
- consectetur adipiscing elit,
- sed do eiusmod tempor incididunt ut labore et dolore magna aliqua.
That’s it about typography. The above pieces should prepare you to tackle most of the situations where you need to add/format text in a page or a post. Happy editing!